 TL;DR
TL;DR
Multi-catch mouse traps capture multiple rodents in a single setting without baits or poisons, using a tunnel design that exploits natural running behavior ?effective for moderate infestations in enclosed spaces like barns and feed storage areas with catch rates of 8-20 mice per unit per week.
Live capture cages are the preferred choice when non-lethal control is required ?rabbits, voles, chipmunks, and other non-target species can be released unharmed. Cage sizing is critical: a 15x15x40 cm cage works for mice and voles, while rabbits require 30x30x60 cm minimum.
Strategic placement near runways and nesting areas determines trapping success more than trap quality itself. Place traps along walls where rodent activity is highest, within 15 meters of primary food sources, and in sheltered locations protected from weather and predators.
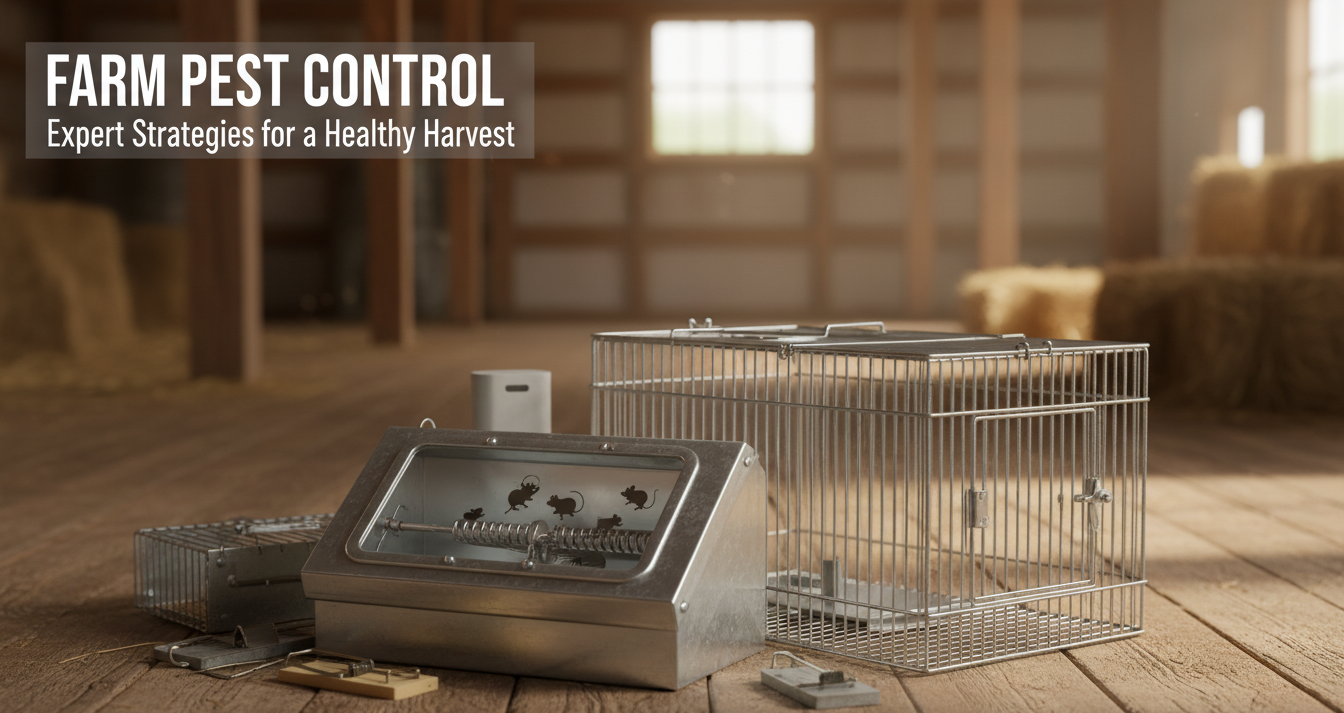
Multi-Catch Mouse Traps: How They Work
Multi-catch mouse traps represent a significant advancement in farm rodent control, offering a reusable, poison-free solution that captures multiple mice without the health risks associated with rodenticides. In my 12 years designing livestock equipment, I have helped hundreds of dairy and beef operations implement integrated pest management programs where multi-catch traps form the foundation of their rodent control strategy.
The fundamental design principle is deceptively simple: a horizontal tunnel with multiple one-way entry doors that allow rodents to enter but not exit. The tunnel is typically constructed from galvanized steel wire mesh (16-20 gauge, 6mm grid opening) or durable plastic. When a mouse runs through the tunnel searching for food or shelter ?behaviors deeply embedded in their survival instincts ?it triggers a spring-loaded door mechanism that closes behind it. Unlike snap traps that kill on contact, multi-catch traps are designed to hold rodents alive until the operator releases them.
There are two primary mechanical designs:
The tunnel-and-door design uses gravity-fed one-way doors at each end. When a mouse pushes against the door from the inside, it opens and allows exit. But when the door swings closed after the mouse passes through a central chamber, a locking bar engages and prevents re-opening. This design is self-resetting ?you can catch 15-25 mice in a single night in a heavily infested barn.
The paddle-wheel design uses a rotating cylinder inside the tunnel. As mice run across the paddle to access the bait (peanut butter, oats, or seeds placed in a central bait cup), the weight triggers rotation that drops the caught mouse into a collection chamber below. This design requires daily emptying but offers very high catch rates because mice cannot resist running across the rotating paddle.
Key specifications for multi-catch traps:
- Tunnel length: 30-45 cm ?long enough to accommodate multiple rodents
- Tunnel diameter: 7-10 cm ?fits mice, young rats, and voles
- Entry door angle: 25-35 degrees from vertical ?allows easy entry, prevents exit
- Mesh gauge: 16-20 gauge galvanized steel or 3-4 mm plastic
- Capacity: 8-25 mice depending on design before reset required
- Weight: 0.5-1.2 kg ?heavy enough to remain stable when rodents enter
Multi-catch traps are not bait-dependent, which is a significant advantage in agricultural settings where food sources are abundant. Unlike snap traps that require attractive baits to compete with available feed, multi-catch traps rely on the rodents innate behavior of exploring enclosed spaces. Place them along walls where mice naturally run ?their thigmotactic response drives them to stay in contact with surfaces. Per EPA recommendations on non-chemical rodent control, exclusion and trapping should form the foundation of any IPM program. For additional guidance on integrated pest management in agricultural settings, consult Cooperative Extension pest management resources and university agricultural extension services.
Live Capture Cage Specifications and Sizing
Live capture cages serve a different purpose than multi-catch traps: they allow non-lethal removal of target and non-target species, essential for organic dairy operations, farms with pets or wildlife concerns, and regulatory situations where kill traps are restricted. Understanding cage sizing is the most critical specification factor ?a cage too large allows small rodents to escape, one too small may not accommodate the target animal at all.
| Target Species | Minimum Cage Dimensions (LxWxH) | Grid Size | Recommended Trap Type |
|---|---|---|---|
| House mouse (adult) | 15x15x40 cm | 6mm | Small live cage |
| Vole (field/desktop) | 15x15x30 cm | 6mm | Small live cage |
| Chipmunk | 20x20x45 cm | 12mm | Medium live cage |
| Eastern cottontail rabbit | 30x30x60 cm | 25mm | Large live cage |
| Juvenile rat | 25x25x45 cm | 12mm | Medium live cage |
| Adult rat | 30x30x60 cm | 12mm | Large live cage |
The trigger mechanism in live capture cages typically uses a pressure-sensitive plate or treadle. When the target animal’s weight (typically 15-50 grams for mice, 80-200 grams for rats, 1-2 kg for rabbits) applies pressure to the treadle, a spring-loaded door snaps shut. Modern cages use a smooth closure mechanism that prevents injury to the animal’s nose or paws during capture and door closure ?check that your cages have rounded door edges and secure latches that won’t accidentally open during transport.
Cage construction materials matter for durability and safety:
- Galvanized steel wire mesh: Most durable, rust-resistant, 10-15 year lifespan with proper care
- Plastic-coated wire: Corrosion-resistant, quieter operation, slightly higher cost
- Solid aluminum: Lightweight and rust-proof but less rigid ?may warp with repeated use
- Hard plastic (commercial grades): Weather-resistant, easy to clean, suitable for outdoor placement but less durable than metal
Sizing your live capture cage correctly is essential:
If the cage is too large, mice and small rodents can activate the treadle and run to the non-triggered end of the cage, avoiding the trigger mechanism entirely. A house mouse can easily navigate a 50 cm path to the bait without stepping on a 10 cm treadle plate.
If the cage is too small, the trap may be triggered by debris, leaves, or wind-blown objects. Additionally, a stressed animal in an undersized cage may injure itself trying to turn around. According to USDA Wildlife Services guidelines, capture cages should allow the target animal to stand, turn around, and adopt a normal posture without touching the cage walls. For humane trapping standards, see AUCC guidelines.
For dairy barn applications where mixed rodent populations exist, I recommend a starter set including one small (15x15x40 cm) and one medium (25x25x45 cm) cage. This covers mice, voles, and juvenile rats with the small cage, while the medium cage handles adult rats and occasional chipmunks. At Sound Hardware, we offer live capture cages in all standard sizes to match specific farm requirements.
Trap Placement Strategy for Barns and Feed Storage
The difference between a successful rodent control program and a disappointing one comes down to placement ?traps placed in the wrong locations catch nothing, while properly placed traps can achieve 80%+ reduction in rodent populations within 4-6 weeks.
Rodent behavior principles that guide placement:
Thigmotaxis (contact with surfaces): Mice and rats naturally run along walls, keeping one side in contact with a surface at all times. This behavior is instinctive ?it provides security from aerial predators and helps them navigate in low-light conditions. Place traps directly against walls, with the tunnel or cage entrance parallel to the wall surface. The optimal position is within 15 cm of the wall, not in the middle of the floor.
Runway identification: Inspect your barn or feed storage area for rodent runways ?smooth tracks of compressed dust, grease marks along walls and baseboards, and droppings. Rodents use the same paths repeatedly. Place traps directly in these runways. In a typical dairy barn, primary runways radiate outward from feed bunks, water fountains, and corner nesting areas.
Distance from food sources: Mice establish feeding territories within 15-25 meters of their primary food source. In a barn with concentrated feed (grain bins, silage bunkers, hay storage), the highest rodent activity is within this radius. Place the highest density of traps within 15 meters of major feed sources ?outside this range, you are catching perimeter rodents that are less likely to enter your stored feed.
Shelter and nesting areas: Rodents nesting in wall voids, hay bales, and equipment storage areas need to travel between nesting and feeding zones. Identify these primary corridors and place traps at corridor intersections. Barns with hay storage on one end and milking facilities on the other typically show heavy rodent activity along the connecting corridor.
Recommended trap density:
- Light infestation (signs present but no visible live rodents): 1 trap per 30 square meters
- Moderate infestation (regular sightings, moderate droppings): 2-3 traps per 30 square meters
- Heavy infestation (visible during daylight, audible squeaking): 5+ traps per 30 square meters, combined with exclusion and sanitation improvements
Placement in specific farm environments:
Dairy barns: Place traps within 3 meters of feed bunks, along the feed alley, near water fountain locations, and at building entry points (doors, windows, ventilation openings). Avoid placement directly in feeding areas where feed particles compete with trap bait.
Feed storage silos and bins: Place traps within 5 meters of bin bases, along perimeter walls, and at any gap where rodents could enter. For bulk feed storage, focus on the perimeter and any area where spillage occurs ?spilled feed creates irresistible attractants.
Hay barns and storage: Hay provides excellent nesting material and, if stored at moisture levels above 15%, can support mold growth that attracts rodents seeking damp shelter. Place traps at 10-meter intervals along walls, with additional traps near any hay bales showing sign of moisture damage or mold.
Perimeter exterior placement: For exterior trapping around building foundations, place traps in protected locations (under eaves, near foundation vents, in vegetation-free zones within 2 meters of the building). Use heavy, weather-resistant traps or secure traps inside protective stations. Per Michigan State University Extension pest management recommendations, exterior trapping is most effective in spring and fall when rodents are actively seeking winter shelter or expanding summer territories. For seasonal trapping patterns, consult agricultural extension calendars and entomology pest control guides.
Catch Rate Comparison: Which Trap Performs Best
Choosing between multi-catch traps and live capture cages depends on your pest management objectives, the target species, and operational constraints. A direct comparison helps clarify which solution best fits your operation.
| Metric | Multi-Catch Trap | Live Capture Cage |
|---|---|---|
| Average catch rate (per unit/week) | 8-20 mice | 3-8 rodents |
| Self-resetting | Yes (tunnel design) | No ?manual reset required |
| Target species versatility | Mice, small voles only | Mice, rats, rabbits, chipmunks |
| Non-target animal safety | Low ?catches any small mammal | High ?release unharmed |
| Labor requirement | Daily check (paddle-wheel) Weekly (tunnel design) |
Daily check required |
| Initial cost per unit | $15-40 | $25-60 |
| Longevity (years) | 5-10 years | 8-15 years |
| Bait required | Optional (peanut butter, seeds) | Recommended (peanut butter, grains) |
| Weather resistance (outdoor) | Limited ?needs shelter | Good (galvanized steel) |
| Live capture capability | No | Yes |
For most dairy and beef operations with moderate mouse populations, multi-catch traps offer the best return on investment. The self-resetting tunnel design means you can achieve significant population reduction with weekly maintenance, and the high catch capacity handles the 15-50 mouse populations typical of agricultural buildings. The lower labor requirement (checking once or twice weekly versus daily) makes multi-catch traps practical for operations where staff time is limited.
Choose live capture cages when:
- Non-lethal control is required by organic certification standards or farm policy
- Non-target wildlife is present ?rabbits, opossums, or wildlife that may enter barns
- Regulatory restrictions on kill traps or rodenticides apply
- Larger target species (rats, rabbits) are the primary pest concern
A combined approach often works best: Start with multi-catch traps to rapidly reduce the core population, then transition to live capture cages for ongoing maintenance and wildlife exclusion. In operations I have consulted, this tiered approach achieved 90%+ population reduction within 8 weeks while maintaining zero non-target casualties.
Maintenance and Reusable Trap Care
Proper maintenance extends trap service life from 2-3 years to 8-10 years while preserving catch effectiveness. Neglected traps become less effective as odor contamination, rust, and mechanical wear reduce their appeal to target rodents.
After each trapping cycle (every 1-7 days depending on trap type and infestation level):
- Empty the trap contents in a designated disposal area ?for kill traps, immediate disposal prevents disease transmission and odor. For live capture cages, release rodents at least 500 meters from the original capture location to prevent return. Wear disposable gloves during handling.
- Rinse all components with hot water (minimum 50 degrees C) to remove organic material, blood, and urine. Do not use cold water ?it coagulates proteins and makes cleaning more difficult.
- Scrub with a veterinary disinfection solution ?2% chlorhexidine or 0.5% povidone-iodine. These broad-spectrum disinfectants are effective against the bacterial and viral pathogens commonly carried by rodents (Salmonella, hantavirus, lymphocytic choriomeningitis virus). Avoid bleach solutions, which corrode metal components and leave residues that deter rodents from entering traps.
- Rinse thoroughly with clean water to remove disinfectant residue.
- Air dry completely before storage or repositioning. Damp traps develop mold and rust, both of which reduce effectiveness dramatically.
Monthly maintenance:
- Inspect mesh integrity ?check for rust spots, broken welds, or deformed wire that could injure animals or allow escape. Replace wires individually or the entire trap if structural integrity is compromised.
- Lubricate moving parts (hinges, trigger mechanisms, door springs) with food-grade silicone lubricant. This prevents rust and ensures smooth door closure ?a door that sticks or closes slowly enough to allow escape defeats the trap’s purpose.
- Inspect trigger sensitivity ?test pressure-activated triggers with known weights to ensure they engage at specified sensitivity settings. Over time, springs lose tension and triggers become less reliable.
- Check bait cups for cracks or contamination. Replace bait cups showing signs of mold, old bait residue, or structural damage.
Annual maintenance (beginning of each pest season):
- Full disassembly and deep cleaning ?take the trap apart completely, soak components in enzymatic cleaner for 30 minutes, scrub all surfaces with a soft brush, and rinse thoroughly.
- Visual inspection for wear patterns ?identify components showing wear that might affect trigger timing, door closure, or structural integrity. Order replacement parts while the trap is still functional.
- Test under operational conditions ?place the cleaned and reassembled trap in a known rodent runway for 48 hours to verify catch effectiveness before placing in active service.
- Documentation ?record the trap serial number, purchase date, and maintenance history. This data helps predict replacement timing and identify design improvements for your specific application.
Storage best practices: Store traps in a clean, dry location at room temperature when not in use. Avoid outdoor storage sheds where temperature fluctuations and humidity cause condensation on metal surfaces. Hang traps on wall-mounted pegboard systems or place in sealed plastic containers with silica gel desiccant packets. Never store traps in feed storage areas ?residual feed particles attract pests and contaminate traps.
Typical service life expectations: With proper maintenance, a quality multi-catch trap lasts 5-10 years, while galvanized steel live capture cages can last 8-15 years. Traps showing rust on more than 20% of the surface, cracked or split mesh, or non-functional trigger mechanisms should be replaced. Sound Hardware offers replacement traps and repair parts to extend the service life of your existing equipment.
FAQ
Q: What is the most effective trap type for mouse control in dairy barns?
Multi-catch tunnel traps offer the highest catch rate and lowest labor requirement for barn mouse control. The tunnel design captures 8-20 mice per week without requiring daily maintenance, and the self-resetting mechanism handles moderate to heavy infestations effectively. Place traps along walls in known runways, with 1 trap per 20-30 square meters in moderate infestations. For heavy infestations (visible live rodents during daylight), increase density to 3-5 traps per 30 square meters and combine with sanitation and exclusion improvements.
Q: How do I determine the correct live capture cage size for my target pest?
Cage sizing should allow the target animal to stand, turn around, and adopt a normal posture without touching cage walls. For house mice and voles, use a 15x15x40 cm cage with 6mm grid. For rats and chipmunks, use a 25x25x45 cm cage with 12mm grid. For rabbits, use a minimum 30x30x60 cm cage with 25mm grid. An undersized cage causes stress and self-injury; an oversized cage allows small rodents to avoid the trigger mechanism. Sound Hardware offers size guides for all common farm rodent species.
Q: Where should traps be placed for maximum effectiveness in feed storage areas?
Place traps within 15 meters of major feed sources, along walls in known runways, and at building entry points. Spilled feed is the primary attractant in storage areas ?position traps near spillage zones, feed transfer points, and bin bases. The highest activity zones are within 25 meters of concentrated feed, so concentrate your trap placement in this radius. Avoid placing traps in the exact center of open spaces ?rodents avoid crossing open areas and will bypass the trap.
Q: How often should traps be checked and emptied?
Multi-catch tunnel traps should be checked 1-2 times per week; paddle-wheel and live capture cages require daily checking. Daily checking is essential for live capture cages to prevent captured animals from dying, stress, or escape. For multi-catch tunnel traps, weekly checking is sufficient because the design holds rodents securely. However, during heavy infestations or warm weather (above 20 degrees C), check traps every 2-3 days to prevent odor buildup that deters other rodents from entering.
Q: Can traps be reused after catching a diseased rodent?
Yes, but thorough disinfection between uses is essential to prevent disease transmission to the next capture. Rodents carry numerous pathogens including Salmonella, hantavirus, lymphocytic choriomeningitis virus, and Leptospira. After any capture, disassemble the trap, clean with hot water, disinfect with 2% chlorhexidine or 0.5% povidone-iodine, rinse thoroughly, and air dry completely before reuse. If the target rodent showed signs of illness (lethargy, unusual behavior), destroy and replace the trap rather than risk contamination in crevices that cleaning cannot reach. Per CDC rodent disease guidelines, always assume captured rodents are potentially infectious.
Need professional-grade traps for your farm?
Browse our complete trap and cage inventory or contact our sales team for specifications and volume pricing.
Post time: May-19-2026