Container Loading Optimization for Bulky Farm Equipment | Sound Hardware
TL;DR — Key Takeaways
- Standard container utilization for bulky farm equipment typically starts around 55-65% of theoretical cube capacity — with systematic pallet configuration, disassembly strategy, and void filling, this can be improved to 80-85%, cutting freight cost per unit by 15-25%.
- Drinking bowls should be nested 4-6 per layer and stacked 3-4 layers per pallet with corner protectors and stretch wrap — this configuration achieves approximately 18-24 units per pallet versus 8-12 units when shipped loose or individually boxed.
- Disassembled shipping (flat-packed feeding troughs) reduces freight volume by 50-70% compared to assembled shipping, but adds 30-45 minutes of assembly labor per unit at destination — the breakeven labor rate determines which approach is more economical.
Why Farm Equipment Loading Is Different from Any Other Cargo Category
I have loaded hundreds of containers of livestock equipment at our Ningbo factory over twelve years, and farm equipment is a uniquely challenging cargo category. Unlike consumer goods — which are typically small, uniform, rectangular, and stackable — farm equipment combines irregular shapes (curved drinking bowl bodies, angled feeding trough edges), high weight (galvanized steel troughs at 25-45kg each), fragile components (plastic float valves, ceramic magnets), and strict weight distribution requirements. The standard container utilization rate for first-time farm equipment importers is consistently 55-65% of theoretical capacity — meaning 35-45% of the freight cost they are paying is for empty cubic meters of container space.
The physics challenge: a 20ft GP container offers approximately 28-30 CBM of internal volume and a maximum payload of approximately 26,000kg (after subtracting container tare weight). For lightweight plastic drinking bowls (approximately 1.5kg each packed weight), the container will fill its cubic capacity long before it reaches the weight limit — this is a “cube-out” scenario where space optimization is the priority. For heavy galvanized steel feeding troughs (35-45kg each), the container reaches its weight limit before half the cubic space is used — this is a “weigh-out” scenario where weight distribution and securing are the priorities. Most mixed farm equipment containers are simultaneously cube-constrained on some SKUs and weight-constrained on others — the loading plan must solve both constraints simultaneously. Per IMO CSS Code (Code of Safe Practice for Cargo Stowage and Securing), all cargo must be stowed and secured to withstand the accelerations encountered during sea transport, including rolling (up to 30 degrees), pitching, heaving, and vibration. The CSS Code is the international standard that governs container loading safety.
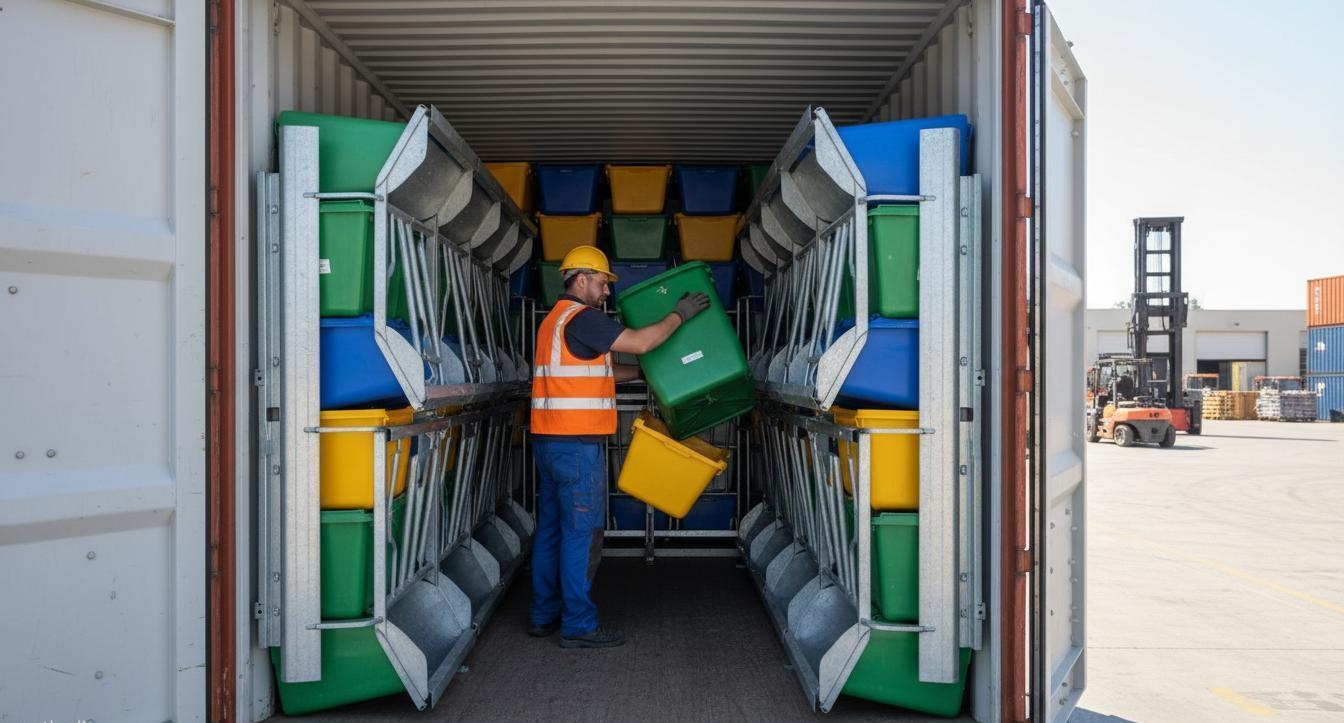
Pallet Configuration for Drinking Bowls: Maximizing Units per Pallet Without Damage
Drinking bowl pallet configuration is a stacking optimization problem with a damage-rate constraint. The objective: maximize units per pallet while maintaining damage rates below the acceptable threshold (typically 0.5-2% depending on product value). The standard Euro pallet (1,200mm × 800mm) can accommodate 4 to 6 drinking bowls per layer depending on bowl diameter (typically 250-400mm). The number of layers is limited by: (1) pallet height — total pallet height should not exceed 1,200mm to fit through standard container door height (approximately 2,280mm in a 20GP, allowing two stacked pallets); (2) bottom-layer crush resistance — the bottom layer of bowls must support the weight of all layers above without deformation.
For a standard 300mm diameter plastic drinking bowl, the optimal configuration is 5 bowls per layer × 4 layers = 20 bowls per pallet, with 3mm corrugated cardboard dividers between layers and 40mm × 40mm corner protectors under the stretch wrap. This configuration achieves a pallet weight of approximately 30-35kg (bowls at 1.5kg each plus packaging), which is compatible with manual pallet truck handling. Corner protectors are essential — I have seen shipments where corner protectors were omitted and the stretch wrap alone was trusted to hold the load, resulting in bowls shifting during transit and the outer bowls on each layer arriving with crushed rims. The damage rate with corner protectors: under 0.5% (1 damaged bowl per pallet of 160 units). Without: 3-5% (5-8 damaged bowls per pallet).
At Sound Hardware, we use standardized pallet configuration sheets that specify layer count, units per layer, interlayer material, corner protector type, and stretch wrap specification (minimum 23μm thickness, 300% stretch ratio, 3 full wraps) for every drinking bowl model. The configuration sheet travels with the container loading plan to the destination warehouse, where it helps the receiving team know exactly how many units are on each pallet without opening every pallet.
Feeding Trough Loading Strategies: Disassembled vs Assembled Shipping Trade-offs
Feeding troughs — especially galvanized steel troughs for cattle and sheep — present the most significant space-vs-labor trade-off in farm equipment shipping. An assembled 3-meter galvanized steel cattle trough, with its curved walls, rolled edges, and drain fitting, occupies approximately 0.8 to 1.2 CBM on its own — nearly 3-4% of an entire 20GP container. The same trough disassembled into flat panels (ends removed, walls separated, drain fitting packed separately) occupies approximately 0.2 to 0.3 CBM — a 65-75% cubic reduction.
| Shipping Method | Cubic per 3m Trough | 20GP Capacity (troughs) | Labor at Destination | Damage Risk |
|---|---|---|---|---|
| Assembled | 0.8-1.2 CBM | 8-12 units | Zero assembly | Low (one-piece structure) |
| Disassembled (flat-pack) | 0.2-0.3 CBM | 40-60 units | 30-45 min/unit | Moderate (assembly quality) |
| Semi-assembled (ends attached) | 0.4-0.6 CBM | 19-30 units | 10-15 min/unit | Low-moderate |
The economic breakeven: if the destination assembly labor cost is under US$30-40 per hour, disassembled shipping is almost always more economical because the freight savings (20-30 extra troughs per container) far exceed the assembly labor cost. For high-labor-cost destinations (Australia, Western Europe, US coastal cities with US$50-80/hour assembly labor), the semi-assembled approach — ends pre-attached, walls and fittings packed flat alongside — represents the optimal balance, saving approximately 40-50% on cubic versus fully assembled while keeping assembly time to 10-15 minutes per unit. At Sound Hardware, we offer all three configurations and let the buyer calculate the breakeven based on their local labor rate.
Weight Distribution in 20GP: Why Center Load Matters for Structural Integrity
The weight distribution in a container directly affects both transport safety and container structural integrity — and it is governed by physics, not preference. The general rule: approximately 60% of the total payload should be in the front half of the container (nearest the tractor), with the remaining 40% in the rear half. This front-bias keeps the container’s center of gravity forward of the trailer axle, which is essential for stable road handling when the container is on a chassis. An improperly loaded container with too much weight in the rear will cause trailer sway at highway speeds — a serious safety risk.
For mixed farm equipment containers: position the heaviest pallets (galvanized steel troughs, large drinking bowls with metal frames) at the front of the container, against the bulkhead wall. Medium-weight pallets (plastic drinking bowls, AI equipment, syringes) go in the middle third. Lightest pallets (packaging materials, spare parts boxes, display items) go in the rear third. The center of gravity of the loaded container should fall within 1.2 to 1.5 meters from the front bulkhead for a 20ft container — this is the stable range that road transport regulations in most countries require. Weight distribution across the width should be balanced within 5% left-to-right to prevent container tilt during lifting.
Per IMO CSS Code guidelines and ISO 14859 container securing standards, individual items over 100kg must be secured independently to prevent shifting under 0.8g of lateral acceleration and 1.0g of longitudinal acceleration — the design basis for ocean-transit cargo securing.
Securing Methods for Ocean Transit: Bracing, Blocking and Dunnage Requirements
Cargo securing inside a container has three primary methods: bracing (rigid structural members that transfer load forces to the container walls and floor), blocking (wooden or plastic blocks that prevent individual items from sliding or rolling), and dunnage (void-filling material that prevents relative movement between cargo items). For farm equipment, all three are typically needed in combination.
Bracing uses 2×4 or 4×4 timber (or equivalent metal bracing bars) to create rigid load-bearing structures that bridge gaps between cargo and container walls. The timber must be structural-grade (not pallet-grade) and nailed or bolted to the container floor (using the container’s lashing points where available). Blocking prevents individual items from sliding on their pallets — for drinking bowls, L-shaped corner blocks cut from 19mm plywood, secured with 50mm wood screws into the pallet deck, prevent individual bowl boxes from shifting during transport vibration. Dunnage — typically air bags (dunnage bags) inflated to 0.2-0.3 bar (3-5 psi) — fills the remaining horizontal and vertical gaps between pallets and between the pallet stack and the container roof.
The most common securing failure I see in farm equipment containers is insufficient bracing at the container door end. When the container is on the vessel and the ship rolls, the cargo mass pushes toward the doors. If there is empty space between the last pallet row and the doors, the cargo can shift into that space, putting load directly on the door locking bars. Container doors are not designed to bear cargo load — they are weather seals, not structural restraints. A proper door-end brace consists of: a timber cross-brace spanning the container width at the door opening, secured to the container corner posts, with the last pallet row positioned against the cross-brace (not against the doors). I recommend a minimum 100mm gap between the bracing structure and the door face.
Loading Sequence Planning: The Order That Prevents Last-Item Being Hardest to Extract
A well-planned loading sequence makes unloading at destination at least 40% faster — and unloading speed directly affects destination labor costs and container detention/demurrage charges. The loading sequence rule: heaviest and largest items first (loaded at the container front), then medium items (middle third), then lightest and smallest items (rear third, nearest the doors). This means: feeding troughs and heavy pallets first → drinking bowl pallets next → lightweight accessory boxes, spare parts cartons, and display materials last. This sequence ensures the items the destination warehouse needs first (often the display materials for immediate retail display, or the spare parts for service stock) are positioned at the door end for easy extraction.
A loading plan diagram — literally a sketch showing where each pallet is positioned in the container — should accompany every mixed-load shipment. This diagram costs nothing to produce but saves the destination warehouse hours of searching for specific pallets. At Sound Hardware, we provide a container loading diagram with every mixed-SKU shipment, with each pallet position labeled by SKU number and quantity, so the destination team can pull specific pallets in the order they need without emptying the entire container.
Space Utilization Calculation: Actual Cube vs Theoretical Cube and How to Close the Gap
The space utilization gap — the difference between theoretical container cube (28-30 CBM for a 20GP) and actual loaded cube — is the single largest cost leak in farm equipment logistics. A 60% utilization rate on a 20GP container means 12 CBM of paid-for space is carrying nothing but air. At a freight cost of US$2,800 per 20GP, that is US$1,120 paying for empty cubic meters.
| Utilization Rate | Loaded CBM | Wasted CBM | Wasted Freight Cost | Improvement Strategy |
|---|---|---|---|---|
| 55-60% (typical first load) | 15-17 CBM | 11-13 CBM | US$1,000-1,200 | Baseline — no optimization |
| 70-75% (pallet optimized) | 19-21 CBM | 7-9 CBM | US$650-850 | Standardized pallets + void fill |
| 80-85% (fully optimized) | 22-24 CBM | 4-6 CBM | US$380-570 | Disassembly + pallet nesting + dunnage |
The path from 60% to 85% utilization: (1) standardize all pallet sizes to Euro (1,200×800mm) or ISO (1,200×1,000mm) — mixed pallet sizes create unusable gaps; (2) disassemble large items where the labor economics support it; (3) fill all vertical space above pallets with lighter items stacked on top or with dunnage bags to the container roof; (4) eliminate single-item cartons that cannot stack by consolidating them onto mixed pallets. The per-unit freight cost reduction from improving utilization from 60% to 85% is approximately 17-25% — for a container of drinking bowls with a landed unit cost of US$12, this is a saving of US$0.50-0.75 per bowl. On a 2,000-bowl order, that is US$1,000-1,500 in freight savings.
Frequently Asked Questions
- Q1: How do I maximize container space when loading bulky farm equipment?
- Maximize space by: (1) disassembling large items into flat-packed components; (2) standardizing pallet sizes to Euro or ISO; (3) configuring pallet loads with drinking bowls nested 4-6/ layer × 3-4 layers with corner protectors; (4) distributing weight with heavy items front; (5) using dunnage bags and bracing to fill all gaps. These steps can improve utilization from 55-60% to 80-85%.
- Q2: What is the best way to secure drinking bowls and feeding troughs for ocean shipping?
- Drinking bowls: nest 4-6 per pallet layer with cardboard dividers, corner protectors, and stretch wrap (23μm+ thickness, 3 wraps). Feeding troughs: disassemble or semi-assemble for flat packing, use wooden bracing (2×4 timber) for heavy steel troughs, secure individual items over 100kg independently to resist 0.8g lateral and 1.0g longitudinal acceleration per IMO CSS Code.
- Q3: How do I calculate the optimal loading configuration for a 20GP container?
- Calculate by: (1) determining each SKU’s palletized dimensions and weight; (2) sketching the container floor plan with pallet positions (Euro pallets: 10 per 20GP, 2 rows of 5); (3) calculating total weight vs container payload limit (26,000kg); (4) verifying center of gravity falls within 1.2-1.5m from front bulkhead; (5) checking pallet height against container door height (2,280mm — 2×1,100mm pallet stacks).
- Q4: What weight distribution requirements apply to heavy farm equipment in containers?
- Weight distribution: approximately 60% of payload in front half, 40% in rear half. Center of gravity should fall 1.2-1.5m from front bulkhead. Left-to-right weight balance within 5%. Individual items over 100kg must be independently secured. Items over 1,500kg require flat rack or open-top containers. Road transport regulations in most countries require the front-biased weight distribution for stable trailer handling.
- Q5: How much does inefficient container loading cost compared to optimized shipments?
- Inefficient loading at 60% utilization wastes US$1,000-1,200 per 20GP container in empty cubic space. Optimizing to 85% reduces per-unit freight cost by 17-25%. For a container of 2,000 drinking bowls at US$12 unit cost, this saves US$1,000-1,500 in freight. Over 10 container shipments per year, the annual savings from optimized loading exceed US$10,000-15,000.
External References: IMO CSS Code · ISO 14859 · USDA Agricultural Transport · World Shipping Council · CSCMP · FIATA · ISM
Post time: May-20-2026