TL;DR
- A veterinary continuous injector should be calibrated by cleaning, inspecting, priming, setting the target volume, dispensing repeated test shots, weighing or measuring the delivered volume, adjusting the dose mechanism, and documenting the final error.
- A practical field acceptance target is often within ±5.0% of the intended equipment delivery volume, while stricter internal quality programs may use ±2.0% when the injector design and test setup can reliably support it.
- Calibration verifies the injector only; it does not determine the animal treatment dose, which must always follow the vaccine or drug label and the supervising veterinarian’s protocol.
- Most dosing errors come from air bubbles, worn seals, wrong needle selection, incomplete stroke return, viscous product drag, and operators skipping the first 5 to 10 priming strokes.
To properly calibrate a veterinary continuous injector, treat it as an equipment verification task: clean and inspect the injector, assemble the correct barrel and needle, prime until all air is removed, set the intended delivery volume, dispense a statistically useful series of test shots into a measuring cylinder or onto a calibrated scale, calculate average delivered volume and percentage error, adjust the dose setting, repeat the test, then record the result before use. This process checks whether the injector delivers the selected volume consistently; it does not authorize any vaccine, antibiotic, hormone, anesthetic, or other veterinary medicine dose.
The safest workflow separates three decisions: the veterinarian or approved protocol defines the medicine and dose, the product label defines route and handling limits, and calibration confirms that the continuous injector can physically deliver the selected volume. Because under-dosing can reduce treatment effectiveness and over-dosing can increase residue, adverse reaction, or cost risk, procurement teams should require written calibration instructions, replaceable wear parts, and batch-level quality records when buying veterinary syringes and needles.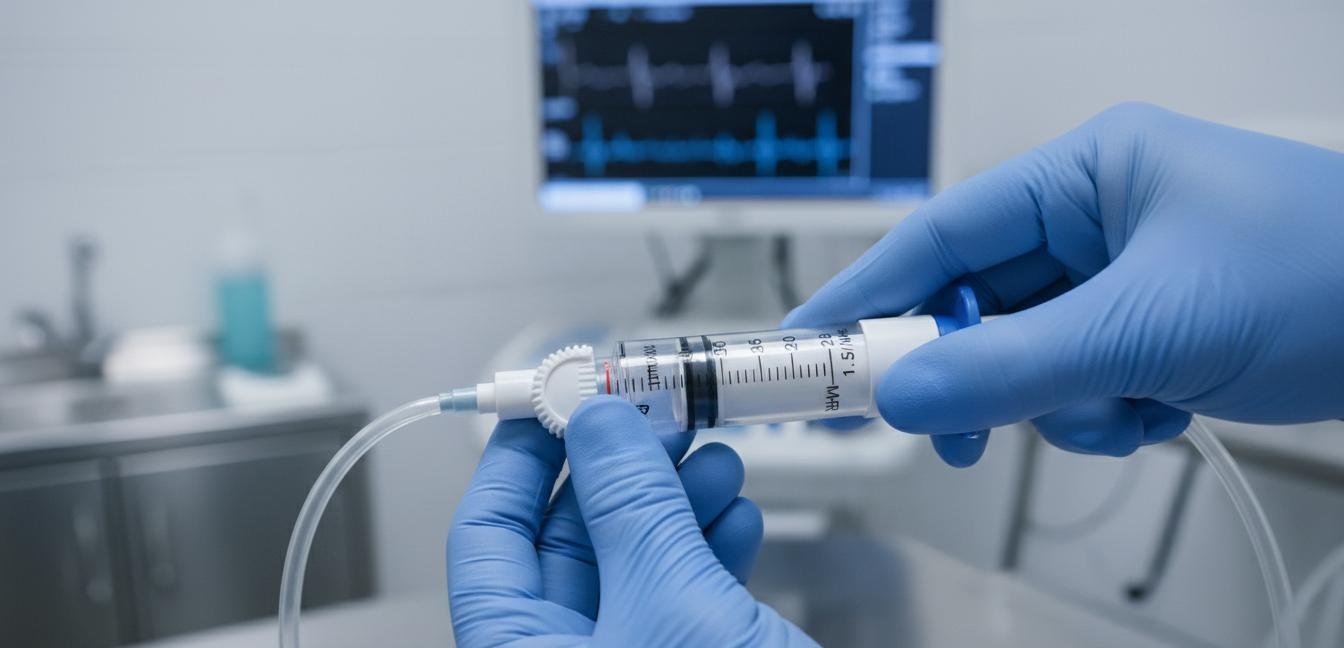
Why does calibration matter before using a veterinary continuous injector?
Calibration matters because a continuous injector converts a mechanical stroke into a measured liquid volume, and that conversion can drift when seals wear, springs fatigue, air enters the chamber, or a viscous product flows more slowly than water. In livestock work, the operator may repeat hundreds or thousands of injections in one session. A small error of 0.10 mL per shot becomes 100 mL over 1,000 injections. That is not a small number when the product is expensive or when the treatment protocol is narrow.
A veterinary continuous injector is a reusable dosing device that delivers a preset volume with each completed trigger stroke. The term “calibration” means comparing the delivered volume against a known reference and adjusting the equipment until the measured error is inside an accepted limit. It is not the same as choosing a treatment plan. I would be uncomfortable with any farm SOP that mixes those two topics, because equipment staff may be excellent at maintenance but not authorized to change veterinary dosage instructions.
According to the U.S. Food and Drug Administration animal drug label guidance, animal drug labels communicate approved directions, warnings, and use conditions. In plain purchasing language, that means a calibrated injector is still only a delivery tool. The label and veterinary protocol decide what may be administered, to which animal class, by which route, and under what withdrawal or safety conditions.
Because the injector is reusable, calibration is not a one-time factory activity; it is a receiving inspection, pre-use check, maintenance trigger, and documentation habit. We have seen the same basic pattern in export after-sales conversations: the buyer blames the injector, the farm blames the product, and the real cause is often a dry O-ring, trapped air, or a dose knob that was not locked after cleaning. It is frustrating because the fix is usually simple, but the loss of confidence is expensive.
What tools and conditions do you need before calibration?
You need a clean injector, compatible tubing or bottle mount, the intended needle type or an equivalent test outlet, clean test liquid, a 0.01 g resolution scale or a graduated cylinder, a stable bench, replacement seals, and a calibration log. Water is acceptable for many equipment checks, but if the production liquid is much more viscous than water, a second verification with a manufacturer-approved simulant or controlled product sample may be necessary. Always follow product handling rules, especially for live vaccines or temperature-sensitive medicines.
For a practical bench setup, I prefer a digital scale with 0.01 g readability for small-volume injectors and 0.1 g readability for larger livestock injectors. Because water has a density close to 1.00 g/mL at normal room temperature, weighing 2.00 g of water is a convenient approximation for 2.00 mL. This is not a laboratory metrology claim; it is a field-friendly equipment check. If your quality program requires traceable accuracy, use calibrated glassware or a certified balance and document the reference device number.
Keep the test temperature stable, ideally around 20°C to 25°C, unless the product’s instructions require another condition. Temperature matters because viscosity changes with heat and cold. A cold oily preparation can resist flow, delay chamber refill, and make the first strokes look low. Because fluid viscosity changes with temperature, so calibration should be performed under conditions that resemble the actual injection session rather than a random storage-room condition.
Use the needle size planned for the job when it is safe and practical, or use a manufacturer-approved test tip if you are only verifying the metering chamber. Needle bore affects back pressure. Tubing length and bottle height also affect refill behavior in bottle-fed continuous injectors. I am strict about this detail because many dosing complaints appear only after the operator changes from a short test tube to a long, curled field tube.
| Item | Recommended specification | Why it matters |
|---|---|---|
| Scale | 0.01 g readability for 0.5 mL to 5.0 mL checks | Small dose errors are visible before field use. |
| Test liquid | Clean water or approved simulant at 20°C to 25°C | Stable viscosity improves repeatability. |
| Replicates | At least 10 measured strokes after priming | Averages reduce random operator variation. |
| Log | Date, device ID, target volume, average volume, error %, operator | Traceability supports quality audits and complaints analysis. |
How do you calibrate a veterinary continuous injector step by step?
The correct calibration workflow is inspection, assembly, priming, target setting, repeated measurement, error calculation, adjustment, retest, and documentation. The sequence looks simple, but skipping one step is exactly how accurate-looking injectors become unreliable in real barns. The following HowTo procedure is written for equipment calibration only. It does not replace a veterinarian’s diagnosis, prescription, drug label, vaccine label, biosecurity plan, or route-of-administration protocol.
Step 1: Clean, dry, and inspect the injector before measurement
Step 2: Assemble the same fluid path you will use in the field
Step 3: Prime until the chamber, tubing, and needle are air-free
Step 4: Set and lock the target volume from the approved protocol
Step 5: Dispense and discard the first measured-looking strokes
Step 6: Measure at least 10 consecutive delivery strokes
Step 7: Calculate percentage error and decide whether adjustment is needed
Step 8: Adjust the dose mechanism and retest until repeatable
Step 9: Document the final result and label the injector status
How should buyers control dosing errors in daily operation?
Buyers should control dosing errors by combining incoming inspection, pre-use calibration, operator training, scheduled seal replacement, fluid-path matching, and written acceptance limits. A continuous injector is not just a piece of plastic and metal. It is a repeatability system. The equipment, product viscosity, operator rhythm, animal movement, and cleaning process all affect the final delivered volume. Procurement teams that evaluate only unit price often pay for it later in complaints, wasted product, and urgent spare-part shipments.
The table below is written for B2B buyers comparing supplier documentation. If a supplier cannot explain these error modes clearly, that is a warning sign. In our view, a trustworthy veterinary injector supplier should provide calibration guidance, exploded parts drawings, spare O-rings, valve maintenance instructions, and a realistic accuracy statement under defined test conditions. “Accurate dosing” is not a magic claim; it is a measured result under stated conditions.
| Error source | Typical symptom | Control action | When to remove from service |
|---|---|---|---|
| Air bubbles in chamber or tubing | Random low strokes, visible bubbles, spongy trigger feel | Prime 5 to 10 strokes or until bubble-free; check tube seals. | Remove if bubbles return after every priming cycle. |
| Worn piston O-ring | Consistent under-delivery, leakage, poor suction refill | Replace O-ring with manufacturer-compatible material and retest. | Remove if barrel or piston is scratched after seal replacement. |
| Check valve contamination | Backflow, delayed refill, irregular output | Clean valve seat; inspect spring and ball orientation. | Remove if valve seat is cracked or chemically attacked. |
| Wrong needle bore | High trigger force, slow delivery, operator short-stroking | Use needle size specified by product label and veterinary protocol. | Remove needle immediately if bent, blocked, burred, or contaminated. |
| Dose knob not locked | Volume drifts during a session | Lock the setting after adjustment; add visual check to SOP. | Remove if lock thread slips under normal trigger force. |
| Viscous or cold product | Low average volume at fast rhythm but acceptable volume at slow rhythm | Follow label storage conditions; verify refill at expected working temperature. | Remove if injector cannot refill reliably at the protocol rhythm. |
According to the World Organisation for Animal Health standards resources, animal health programs depend on controlled procedures, responsible veterinary oversight, and reliable preventive practices. The equipment lesson is straightforward: the injector should support the protocol, not improvise around it. The American Veterinary Medical Association policy resources similarly reinforce that veterinary drugs require proper professional direction. For calibration content, those principles translate into a clear boundary: verify volume delivery, but do not make treatment decisions in the equipment guide.
What acceptance limit should a farm or distributor use?
A reasonable acceptance limit should be defined by the injector manufacturer, the farm quality system, and the risk level of the product being delivered; many field programs use ±5.0% for routine equipment checks, while stricter operations may use ±2.0% with calibrated reference tools. There is no universal limit that fits every injector, liquid, species, and field condition. A 0.05 mL error may be meaningful at a 0.5 mL target, but less meaningful at a 10.0 mL target. Percentage error is usually more useful than absolute error.
For purchasing specifications, avoid vague wording such as “high accuracy.” Ask for the test method. A stronger specification is: “Average delivery error within ±5.0% at 2.0 mL target volume, tested with water at 20°C to 25°C, after 10 priming strokes and 10 measured strokes, using a 0.01 g scale.” That sentence is not glamorous. It is useful. It gives the supplier, distributor, and buyer the same yardstick.
International syringe standards can provide useful thinking even when they do not directly govern a reusable veterinary continuous injector. For example, ISO 7886-1 covers sterile hypodermic syringes for single use and emphasizes standardized performance requirements. The direct product category is different, so do not copy its requirements blindly. However, the quality principle remains valuable: volume delivery claims should be linked to defined test conditions and verifiable measurement methods.
If the product being delivered has a narrow safety margin, the acceptance limit should be tightened only under veterinary and quality-system direction, not by an equipment salesperson trying to sound impressive. I am cautious here because overpromising accuracy can be just as dangerous as underbuilding the device. A reusable injector used in a moving livestock environment is not the same as a laboratory pipette. Honest specifications protect the buyer and the manufacturer.
When should calibration be repeated?
Repeat calibration when the injector is new, after cleaning and reassembly, before a high-volume vaccination or treatment session, after replacing seals or valves, after dropping the device, when changing product viscosity or target volume, and whenever delivered volume is suspected to be inaccurate. A fixed time schedule is helpful, but trigger-based calibration is more reliable because real wear depends on use intensity, cleaning chemicals, storage, and operator handling.
A practical farm SOP may require calibration at receiving, at the start of each campaign, every 500 to 1,000 strokes during long sessions, and after every maintenance event. Export distributors may add a pre-shipment sample check for each production batch. Sound practice is to keep both factory quality records and user-side logs. If a customer reports under-delivery, the first questions should be device ID, target setting, product type, temperature, last seal replacement date, and last calibration result.
Because continuous injectors rely on moving seals and one-way valves, so calibration frequency should increase when the device is exposed to aggressive disinfectants, oily formulations, abrasive residue, or high daily injection counts. I would rather see a buyer replace inexpensive seals early than argue about dosing accuracy after a failed vaccination campaign. Preventive maintenance is dull. It also works.
For operations that export animal products, documentation can also support residue-control and quality audits. Calibration records do not prove that a treatment was medically appropriate, but they do show that the delivery equipment was controlled. That distinction matters in professional livestock production.
What should a B2B buyer ask a supplier before ordering continuous injectors?
A B2B buyer should ask for the injector’s stated volume range, adjustment increment, tested accuracy condition, compatible disinfectants, spare-part list, material contact information, cleaning method, needle compatibility, batch traceability, and calibration SOP. These questions reveal whether the supplier understands field use or only sells a catalog item. The best purchasing teams also request samples and run a small incoming inspection before committing to a container order.
For the Sound-AI syringes and needles category, the relevant buyer conversation is usually not “Which injector is cheapest?” It is “Which injector, needle, seal kit, and documentation package will keep dosing repeatable across a real farm workflow?” That is a healthier question. It includes product performance, user training, after-sales parts, and compliance boundaries.
Ask for material details for product-contact parts, especially if the injector may contact oily products, disinfectants, or repeated sterilization cycles. Ask whether the scale markings are molded, printed, engraved, or otherwise protected from wear. Ask if the supplier can provide private-label packaging with calibration instructions in the buyer’s language. Ask for a retained sample policy. These details are not decoration; they reduce support friction after the order ships.
We recommend adding a simple supplier acceptance clause: each shipment should include model identification, batch number, user cleaning instructions, spare wear-part availability, and a stated equipment calibration method. If the supplier resists that level of transparency, the buyer should treat it as a quality risk. Low purchase price can disappear quickly when a distributor must replace devices, retrain users, or defend unclear dosing complaints.
What safety boundaries must calibration instructions respect?
Calibration instructions must never tell users to change a veterinary drug or vaccine dose, route, withdrawal period, animal class, storage condition, or contraindication; those decisions belong to the product label and qualified veterinary oversight. This guide is limited to checking whether equipment delivers the selected volume. It is intentionally conservative because veterinary medicines affect animal welfare, food safety, worker safety, and regulatory compliance.
According to the European Medicines Agency veterinary medicines resources, veterinary medicinal products are regulated through defined authorization, labeling, and safety frameworks. That regulatory reality should shape equipment content. A syringe supplier can explain priming, cleaning, volume verification, and maintenance. A syringe supplier should not create off-label medical instructions.
Needle safety also matters. Follow the product label and veterinary protocol for route and needle selection, and use farm biosecurity procedures for sharps handling and disposal. Replace damaged or contaminated needles. Avoid cross-contamination between animals and product bottles. If an injector has been used with one product, clean and reprocess it according to the manufacturer’s instructions before any other use. When in doubt, stop and ask the responsible veterinarian.
The cleanest rule is this: calibrate the injector to the approved volume, but never use calibration as a reason to reinterpret the approved medicine instructions. That sentence should be printed in every serious farm SOP. It keeps equipment teams, veterinarians, and purchasing managers aligned.
Static calibration worksheet for procurement teams
Use this worksheet as a no-JavaScript fallback for a calibration calculator: target volume, total measured mass or volume, number of strokes, average delivered volume, percentage error, and pass/fail decision. It is intentionally simple so it can be printed, translated, and included in distributor training packs.
| Field | Example | Your result |
|---|---|---|
| Target volume | 2.00 mL | ____ mL |
| Measured strokes | 10 strokes | ____ strokes |
| Total collected water mass | 19.80 g | ____ g |
| Average delivered volume | 1.98 mL | ____ mL |
| Percentage error | −1.0% | ____ % |
| Acceptance limit | ±5.0% | ____ % |
| Decision | Pass | Pass / Fail |
FAQ
Can I calibrate a veterinary continuous injector with water?
Yes, water is commonly used for a field equipment check because its mass-to-volume relationship is convenient and safe for repeated measurement. However, water may not represent viscous products accurately, so a second verification may be needed when the actual product flows much more slowly. Always follow the product label for handling, storage, and disposal, and never use calibration liquid as a substitute for authorized veterinary instructions.
How many strokes should be tested during calibration?
A practical minimum is 10 measured strokes after priming and stabilization strokes have been discarded. Ten strokes make the average more reliable than a single shot and help reveal inconsistent refill or operator rhythm problems. High-control programs may test more strokes or test several volume settings, especially during incoming inspection of a new supplier batch.
What does a negative percentage error mean?
A negative percentage error means the injector delivered less than the target equipment volume. For example, if the setting is 2.00 mL and the measured average is 1.94 mL, the error is −3.0%. The cause may be trapped air, worn seals, incomplete trigger return, high fluid resistance, or an incorrect dose setting, so the injector should be adjusted or maintained before use.
Does calibration tell me the correct medicine dose for an animal?
No. Calibration only verifies that the injector delivers the selected volume. The correct medicine or vaccine dose, route, animal eligibility, withdrawal period, and safety limits must come from the product label and a veterinarian-approved protocol. Equipment suppliers should not provide off-label treatment advice through calibration instructions.
When should an injector be removed from service?
Remove the injector from service if it cannot meet the defined acceptance limit after cleaning, priming, adjustment, and wear-part replacement. It should also be removed if the barrel is cracked, the piston is scratched, the valve seat is damaged, the dose lock slips, or leakage continues after maintenance. A device that cannot be calibrated repeatably should not be used for animal treatments.
What information should be kept in a calibration log?
A useful calibration log should include the device ID, model, batch or serial number, target volume, measured average volume, percentage error, test liquid, temperature, number of strokes, reference scale or cylinder ID, operator name, date, corrective action, and next calibration trigger. This record helps farms, distributors, and manufacturers resolve complaints with evidence instead of assumptions.
Need a documented syringe and needle package for livestock programs?
Sound-AI supplies veterinary syringe and needle solutions for livestock users, distributors, and OEM programs. If your purchasing team needs reusable injector options, compatible needles, spare wear parts, and calibration-friendly documentation, review the Sound-AI syringes and needles product category and request specifications for your target market, packaging language, and quality-control workflow.
Post time: May-18-2026